 Image 1 of 8
 Image 2 of 8
 Image 3 of 8
 Image 4 of 8
 Image 5 of 8
 Image 6 of 8
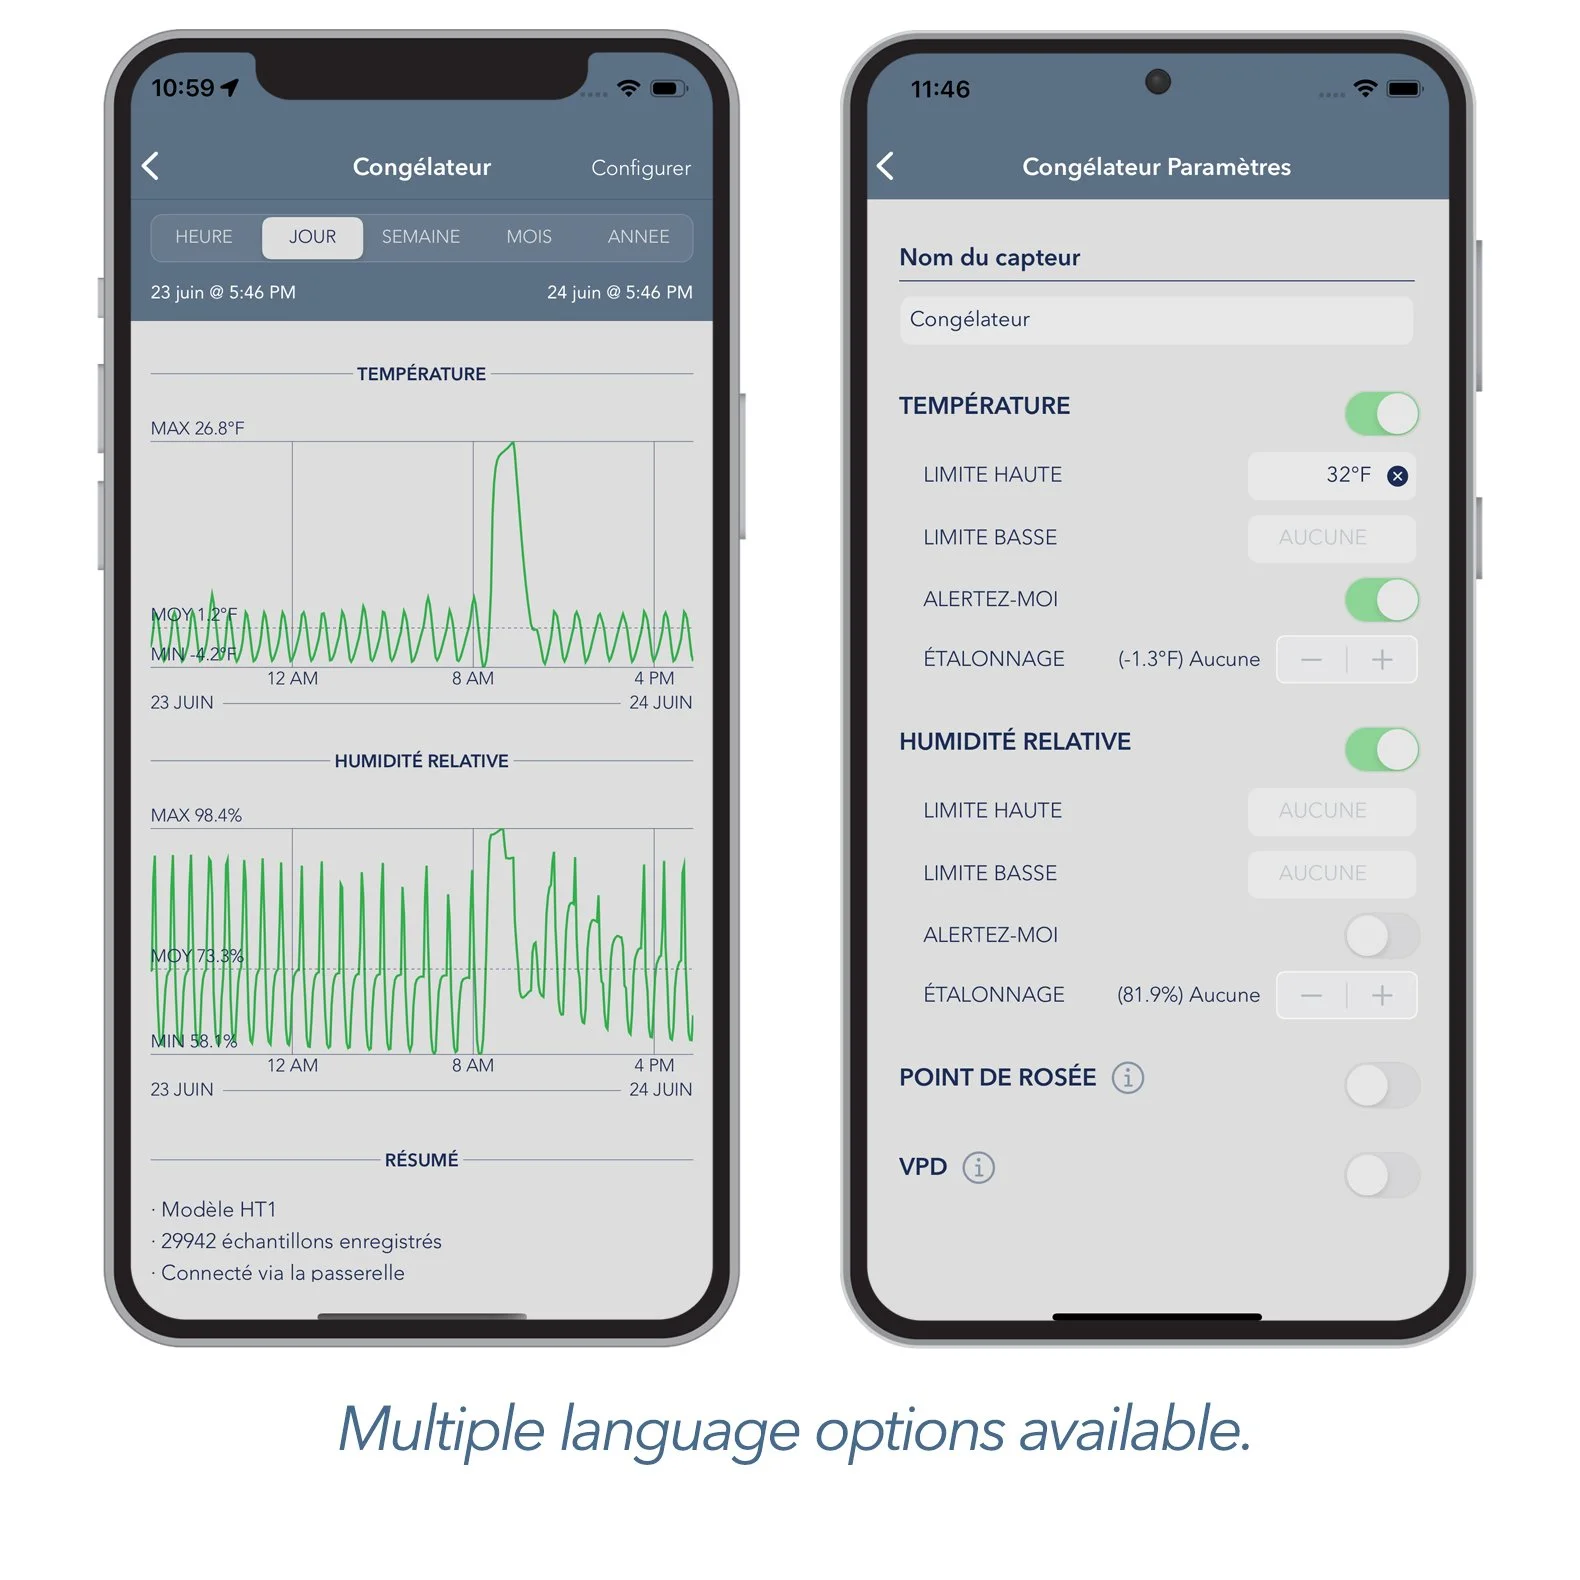 Image 7 of 8
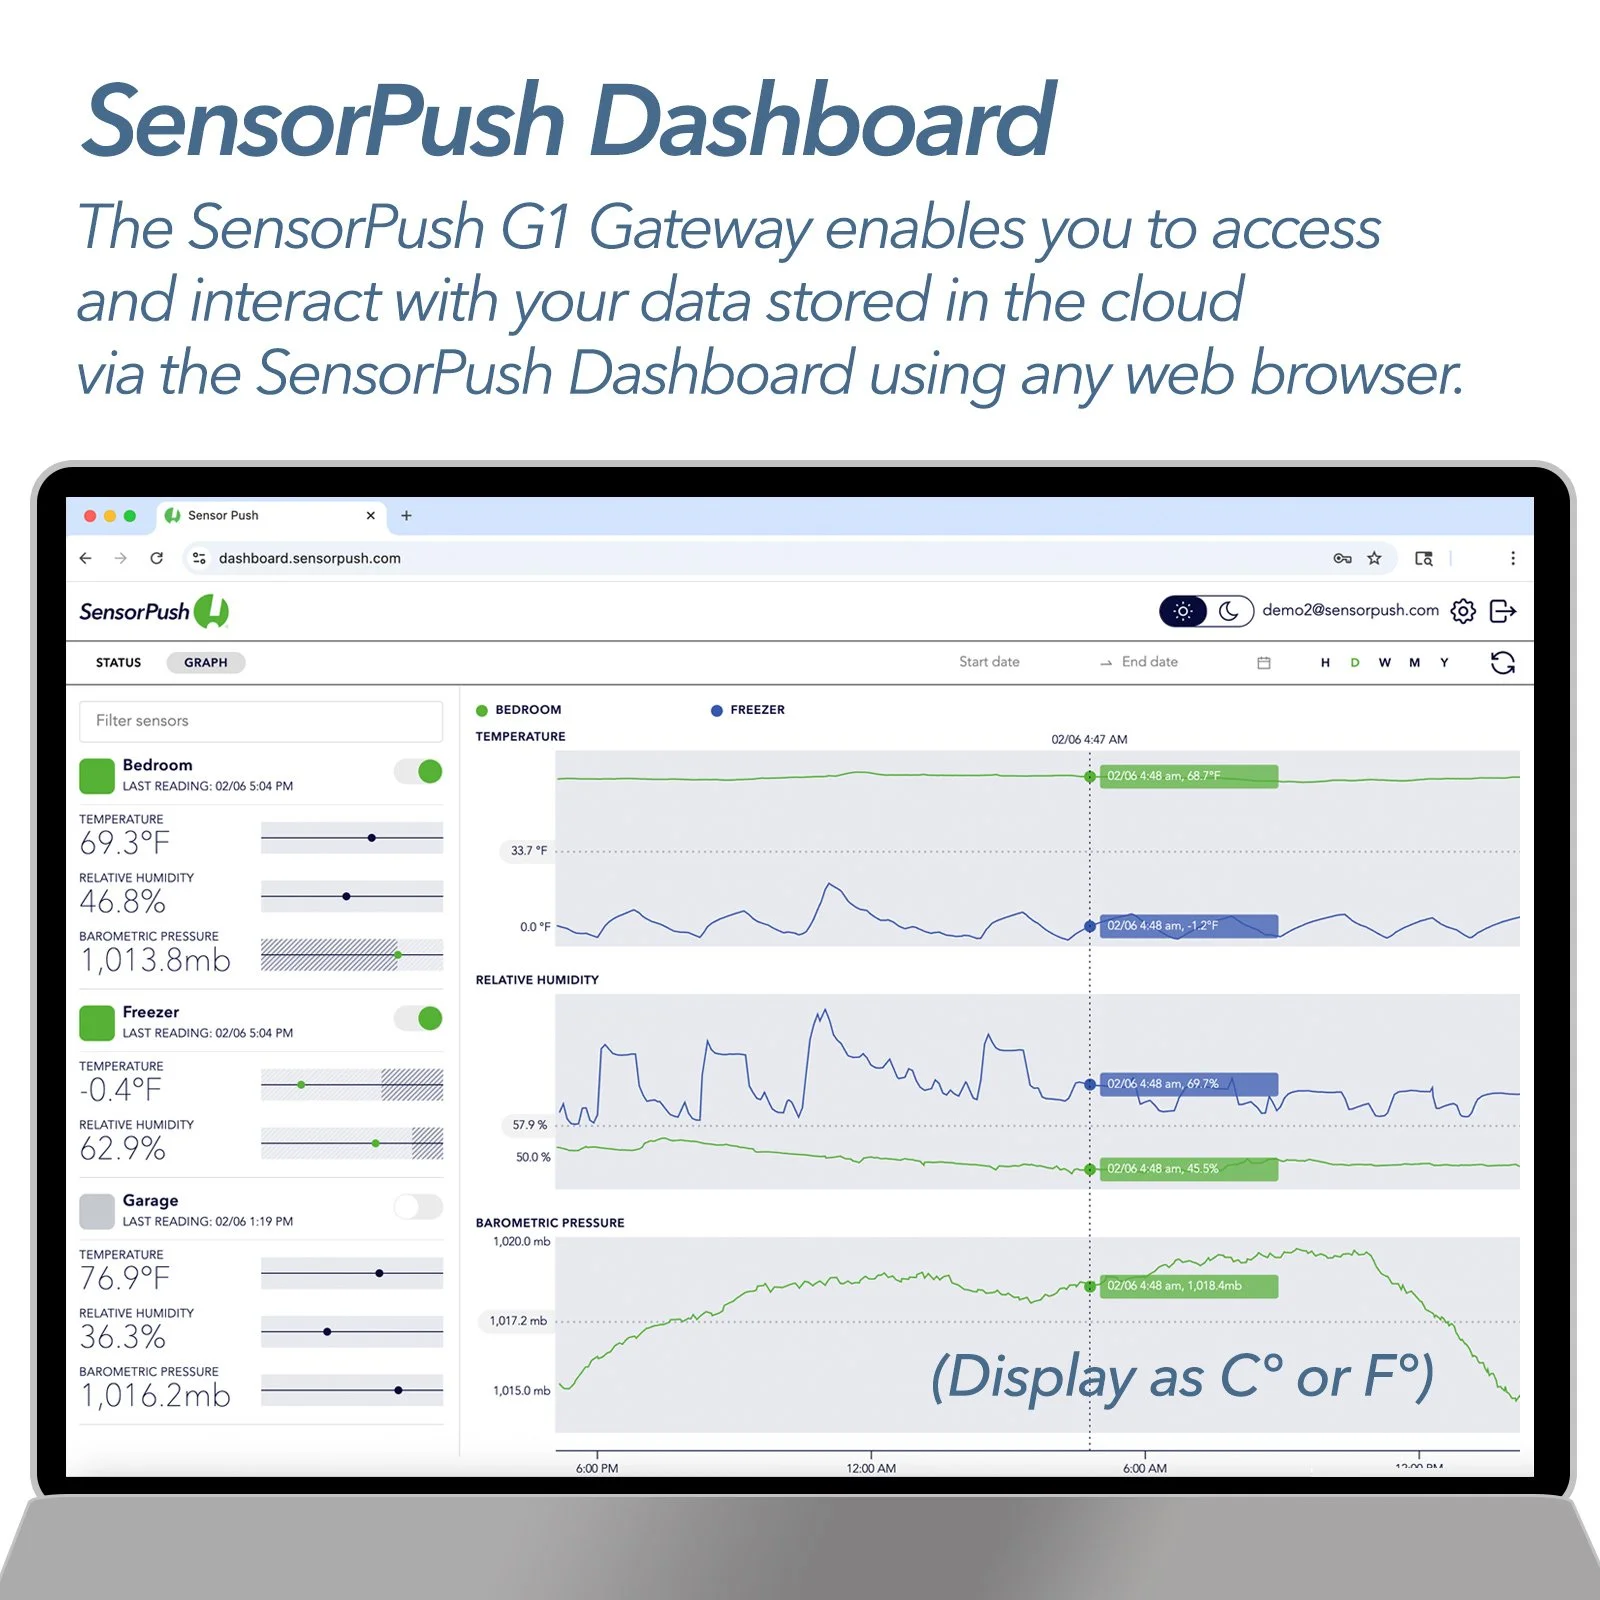 Image 8 of 8
Our sensors use Bluetooth LE to communicate, so without a Gateway the range is limited to Bluetooth range (e.g. around the house). This works well if you only need the data while on site with the sensor. If you would like to monitor SensorPush sensors remotely (e.g. away from the house), you need to use them in conjunction with a SensorPush WiFi Gateway. The Gateway relays the data of any in-range SensorPush sensors to the internet using your local WiFi or Ethernet to your network.
The simple setup process connects your G1 WiFi Gateway to the internet, via WiFi or Ethernet and links it to your SensorPush cloud account. This account is included with the purchase of a G1 WiFi gateway and is easily created during setup. Once online, the gateway receives data via Bluetooth from any in-range SensorPush sensors and relays that information to our web-based service (a.k.a. "the cloud").
The SensorPush app can then retrieve the data from the internet, so you can access it from anywhere. As before, the system has been designed to be as flexible as possible. Multiple gateways on one account? No problem. Multiple phones monitoring one account? Of course. Just log each device in with the same email address and password and your data is instantly synchronized across devices for easy access by family members, employees, house sitters or anyone you wish.
When a sensor is renamed or alert settings are changed, the updates are reflected on all connected devices within moments. When you add new sensors, just pair them with one device. The gateway and all other devices will automatically import them and begin monitoring right away.
Additionally, if all of your sensors are within range of a G1 WiFi gateway, you can now disable Bluetooth within the SensorPush app, or even on your phone (once setup is complete) for improved battery life.
Lastly, we designed the gateway to work seamlessly with the existing sensors, so those of you who have already purchased our sensors are all set.
First, there’s a lot of added flexibility with monitoring. For example, there's no set limit to the number of sensors you can monitor with a single gateway.
Similarly, there’s no set limit to the number of mobile devices that can simultaneously log into a single account. If several people want to get the same alerts about the same sensor on their individual smartphones, they can.
Second, the gateway reads the Bluetooth signals from the sensors through its external antenna. The antenna helps improve the signal fidelity, so this range is slightly better than what you would get from a smartphone or tablet communicating directly with a sensor. As you might guess, the gateway also uses the external antenna to communicate with your WiFi router.
One of the biggest gains in terms of range that you get from using a gateway has to do with the fact that it’s not a mobile device. A gateway doesn’t have to go where you go. The gateway stays with the sensors when you leave and it stays in a location that’s best for communicating with your sensors. In quite a few cases, the best location for a gateway to communicate with your sensors might be some place you don’t visit often even if you are frequently nearby, like in your basement, attic, barn, or storage area. You might want to experiment a bit to find a place that has the best coverage of your sensors and still maintains a stable WiFi connection.
Ethernet is also an option instead of using WiFi. Some of our customers use their sensors in locations without WiFi, or they would rather run direct-burial CAT 5 to an out building like a greenhouse. Whatever the case, this jack allows you to just plug into a network directly.
Finally, the other main benefit to the Gateway is that there is a web-browser based dashboard with added data visualization tools and other features such as email alerts that can only be enabled through internet access. In fact, you can even set up a list of multiple email addresses to receive email alerts.
- Make sure you have the latest version of the SensorPush app from the Apple App Store or Google Play Store.
- Verify that your WiFi router is set to 2.4GHz or "dual band" mode. 2.4GHz is the most common default setting for WiFi routers, so if you haven't changed that specifically, it's likely okay as it is and probably doesn't need adjusted.
- Once you've downloaded or updated the app, remove the Gateway and power adapter from the packaging. The power adapter is located under the right side of the box.
- Locate the Gateway somewhere central to the sensors you want to monitor. Power it up and raise the antenna.
- Open the SensorPush app and tap the Add button. This is the same button previously used to add sensors. Now it will present you with a choice to add a sensor or a gateway. Tap the Add Gateway option.
- Now the phone will form a temporary connection to the Gateway. This might take a minute or two. If it takes longer than that, please try restarting the phone and gateway and try again. If you still cannot connect, let us know and we'll be happy to help.
- Once you're connected, you'll be prompted to create an account (or log in if you have already created one).
- Next, choose a WiFi network and enter a password (if necessary). After the gateway has connected you should see a green checkmark next to the network in the list.
Note: If you have a Hex Based WEP password, you must have the prefix "0x" in front of the password (and the "0" in "0x" is a zero). These are usually only older WiFi networks. - You can also connect via Ethernet. Just plug in the Ethernet cable (DHCP is required) and wait for the "Connected via Ethernet" message to appear.
- Give your gateway a name if you like and you're all set.
- Please try to keep the app up to date for best performance.
- Lastly, if your network has special security requirements, and you need details such as a MAC address or port forwarding info, please check the Specications table on this page for more information.
Basic Troubleshooting
If you continue to experience difficulties after reviewing these basic troubleshooting tips below, please review our FAQ section and/or contact us directly at support@sensorpush.com and a member of the engineering team will get you back to you asap.
- If the WiFi network password isn't accepted return to the "Devices" screen using the back arrow in the upper left of the SensorPush app. Then select the Gateway listed on the screen and choose the "Configure" option. This will re-start the network selection and password entry process.
- If your WiFi network does not appear as an option among available WiFi networks, please verify that the router is communicating via 2.4 GHz or is in "dual band" mode because the Gateway requires 2.4 GHz. If not, then please turn on dual band/2.4GHz and try again.
- If you have an Android phone and a few attempts with the above method does not work, try the same process from the beginning, but turn OFF the bluetooth inside app settings and Android will use a different method to form a temporary connection to the Gateway. Here's how to switch Bluetooth on inside the SensorPush app itself:
1.) Open the app, and from the main screen (the screen with the word "Devices" at the top) select the button in the top left to open app settings.
2.) Once in app settings you'll notice a section called "Configuration" with a switch for Bluetooth. Switch it ON.
Lastly, broadcast/reception range is an important consideration whether you use a G1 WiFi Gateway or not with your sensors. We have an article about range that details some specifics on the topic as it relates to SensorPush products.
We have an API available for the Gateway cloud. Documentation is available here: http://www.sensorpush.com/api/docs. In order to use the API, you need to log in to the gateway cloud dashboard to activate your access.
If you are not yet familiar with APIs, an “API” is an acronym for “Application Programming Interface.” It’s a set of tools that allow programmers to develop software that communicates with our cloud. This makes it possible for these developers to create special purpose applications on top of SensorPush sensor data. For example, someone might have some sensors inside a greenhouse, and they want to trigger a heater to turn on when the temperature drops below a certain level. They could code their own special application that communicates with the SensorPush cloud service to check the temperature of their greenhouse. Their application would then be able to trigger some custom hardware they’ve created to switch on a heater.
NOTE: If you have HT.w and HTP.xw sensors, you can view their data and historical graphs on the web browser dashboard at dashboard.sensorpush.com.
A web browser dashboard makes it easy to view your data such as Gateway status and sensor readings on a laptop or desktop. You can view graphs for sensors, and even layer multiple sensors into a single graph.
The dashboard also allows you to configure certain features specific to the Gateway cloud such as changing your account email address or its password. One major feature you can control through the web dashboard are email alerts. Once you log in, go to the settings icon in the upper right where you will find the option to activate email alerts and other features (e.g. change the password or the email address for the account). Also, the email alert system allows you to create a list of multiple email addresses to receive alerts.
Here is the link to the web dashboard beta: https://dashboard.sensorpush.com


Some other useful notes about the web dashboard in general...
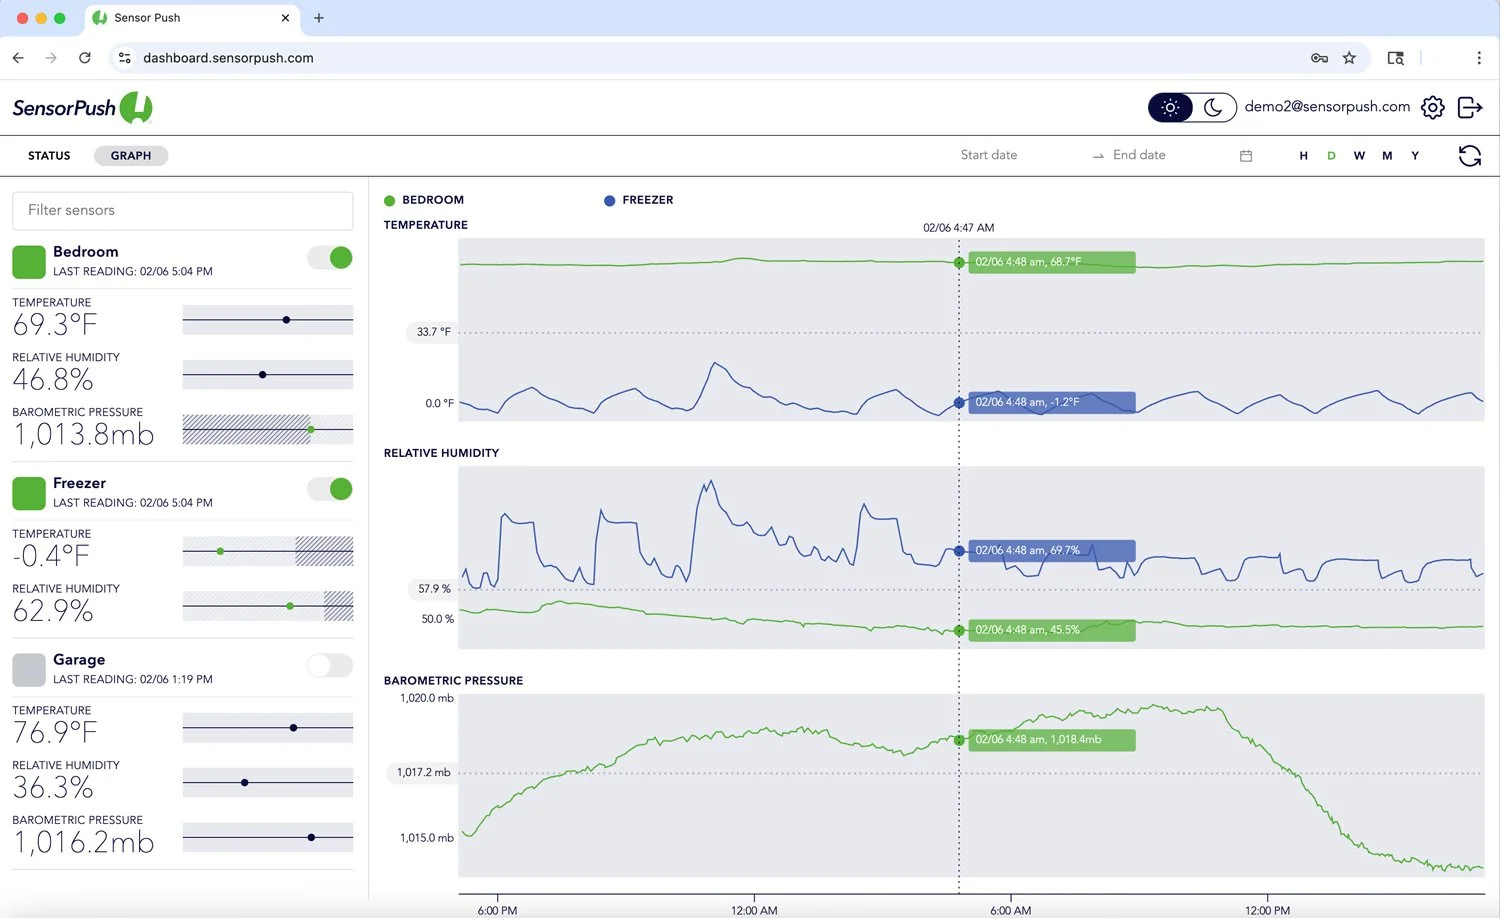
In the dashboard UI, there are two primary modes (selected in upper left). They are the "Graph" and the "Status" modes. Graph mode is the time series data from sensors. Status mode is the current conditions, the signal strength, the last reading, and other details for your sensors. In this view, red indicates that the sensor's last reading is out of date. This is particularly useful for accounts with large numbers of sensors.
In the Graph view, sensors are listed and can be toggled on/off by using the switch to the right of the sensor's name. Once toggled on, that sensor's data appears in one of two viewing options: "Layers" or "Streams."
In the Layers view, multiple sensors can be plotted together on the same graph. In the Streams view, sensors can be plotted alongside one another in parallel. The parallel view will be particularly important once we have sensor types other than temperature and humidity.
The rest of the controls are relatively straightforward if you've used online graphing tools before (e.g. Google Finance). There are time controls to the right, and near the top of the graph toward the left is a small flag that allows you to toggle the scroller pin on and off, etc.
One other note, if you prefer Celsius, you can change this in settings (gear icon upper right).
If you have any questions, you can reach me or the other engineers at support@sensorpush.com and be sure to put [dashboard] in the subject line.
Specifications
| WiFi Frequency Band | 2.4 GHz |
| Width | 5.6 in / 141mm |
| Height | 0.8 in / 20 mm |
| Depth | 4.2 in / 107 mm |
| Weight | 5.3 oz / 149 g |
| Power | DC 5V / 2A The outer diameter of the barrel connector is 5.5mm and the inner is 2.1mm. Also, there is an alternative method for powering the Gateway. If you have a male-to-male USB cable and a phone charger with 5 volts / 2 amps you can power the gateway via its USB port. |
| Cloud API | Here is a link to the docs for the SensorPush Gateway cloud API. In order to gain access, you need to log in to the Gateway web dashboard and accept the terms. |
| Port forwarding | For outbound ports it's: 80, 443, and UDP port 123 (NTP). All network connections are encrypted and no incoming ports are required to be opened on the Gateway. |
| MAC Address | MAC address information is available in the app during set up. It will appear once the Gateway has connected to the mobile device during configuration. To obtain MAC address information for a Gateway that's already set up in the app, first make sure you are on site with the gateway (e.g. same room). Then, open the app to the main screen, select the Gateway from among the devices and then select the "configure" option. The app will then temporarily connect your mobile device to the Gateway using Bluetooth and provide you with MAC address information. |
| Alexa support | https://www.amazon.com/SensorPush-sensorpush/dp/B084JVM7W1 |
| Networking options | Whether using WiFi or Ethernet, your network needs to be able to configure clients automatically via DHCP. Static IP addresses and other custom settings are not available at this time. With WiFi, you’ll be able to use WPA/WPA2, WEP, or open networks. Web-based WiFi authentication (like you often see in a hotel, for instance) is not supported at this time. |
| Wireless types supported | 802.11 B/G/N |